Navigation – Markers
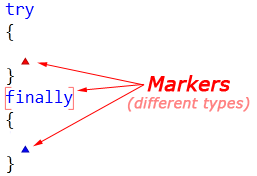
Markers are navigation placeholders that remember important locations inside your source code you’ll need to move to in the future. In most cases, they look like little triangular glyphs in the IDE’s code editor:

Markers are stack-based. When you collect a marker, it pops off the stack. You can jump back at any time to the top marker on the stack by pressing Esc key (or Alt+End).
Markers can be of the following types:
- Hard Marker (red triangle) – is dropped manually onto the current caret position using the default Alt+Home key. They will remain until collected, regardless of any activity on the line they sit on. Currently, manual dropping and manipulating of markers is only available in CodeRush Pro. But there’s a work-around for other products if you wish to apply this feature.
- Soft Marker (blue triangle) – is dropped automatically by CodeRush and/or Refactor! (e.g. through a template expansion, selection embedding, or whenever you apply a refactoring or code provider that takes you away from the original location, etc). This kind of marker will dissolve and vanish from the stack if the line on which they are resident is altered in any way.
- Selection Marker (color brackets) – is dropped manually onto the current selection. It completely restores the selection you had before, once you collect it.
Invisible Marker – is dropped onto the current position when you use navigation features such as Tab to Next Reference or Quick Navigation. This marker is not displayed in the code editor, and is used to restore your original location before you started using the navigation features.
Markers provide the following features:
|
Feature |
Default shortcut |
Description |
| Collect Marker | Esc (Alt+End) | Moves the caret* to the topmost marker within the stack, and removes this marker. |
| Drop Marker | Alt+Home | Drops a marker at the current caret position. |
| Swap Marker | Shift+Alt+Home | Moves the topmost marker within the stack to the current cursor position, and moves the caret to the previous position of the marker. |
| Collect Marker and Paste | Shift+ESC | Moves the caret to the topmost marker within the stack, removes this marker and pastes the contents of the clipboard to the new caret position. |
| Select Marker | Shift+Alt+Page Up | Selects the code section from the current caret position to the topmost marker within the stack. |
Collect Marker
When marker is collected, a circle (like the image above) appears, and starts narrowing until it finally hides. The animation is intended to catch your attention, so you see what happened, instead of looking around the screen where your caret ended up.
Collect Marker and Paste
If the clipboard contains code that you want to paste at a recently-dropped marker, you can jump back to the marker and paste in a single action by pressing Shift+Esc.
Swapping markers
You can even use markers to work in two places at once (alternating between two important locations with a single keystroke), and you can also use them as visual reminders of unfinished code. Often when creating new code, you want to reference another section of code while you work. Usually when this happens, the location where you want to build the new code is far from the source. Markers can solve this problem elegantly. Here’s how:
- Press Alt+Home to drop a marker at the first location where you want to be. Copy anything to the clipboard from this location, if needed.
- Navigate to the secondary location.
- Do what you need at the secondary location until you need to return to the original location.
- Press Shift+Alt+Home to execute the Swap Marker feature. This will exchange the caret with the topmost marker on the stack, replacing the topmost marker with a new one (positioned at the caret location where you just pressed Shift+Alt+Home).
- Now, do what you need at the original location (e.g. copy something to the clipboard).
- When you’re ready to return to secondary location, press Shift+Alt+Home again.
- Repeat steps 3-6 as often as you like, to get the work done.
This is an area where the dynamic nature of markers really excels over static bookmarks. All you need to do is drop a marker at the primary location and press Shift+Alt+Home from the secondary location. As you work down through each respective section of code, the markers move with you, always dropping at the point where you stopped working.
Markers – Comparison with Visual Studio Bookmarks
If you are already proficient with Visual Studio bookmarks, you might be wondering if CodeRush markers offer any compelling benefits over bookmarks. Indeed, markers offer a number of improvements over the basic bookmarks included with Visual Studio. Here’s a quick overview of the differences between markers and Visual Studio bookmarks.
|
Feature |
Markers |
Visual Studio Bookmarks |
| Marks a line for later visitation |
|
|
| Remembers column position | ||
| Remembers view position | ||
| Stack-based, allowing tracing of steps | ||
| Move quickly between two locations |
—– Products: CodeRush Pro Versions: all VS IDEs: any Updated: May/31/2012 ID: C021